

TEACHER ORGANIZATION WITH GOOGLE KEEP

Google Keep is a note taking/to-do list app. You can use it on your desktop and phone to stay up to date and organized. I love using Google Keep because it’s simple and easy to use and allows me to stay organized on the go. As a full-time teacher and teacherpreneur, I have so many list and notes that I need to keep organized. There’s my school and personal to-do lists, grocery lists, TPT product lists, social media lists, blog lists…. the lists go on and on! I’ve used so many different methods in the past to stay organized. I’ve tried using Google Calendar, Google Tasks, paper planners, and even Notes on Iphone. All of them have their pros and cons, but overall I find that Google Keep work the best for my needs.
If you know me, then you know that I love nothing more than stay organized and doing it with a little bit of flair. That’s why I love that Google Keep lets you add custom headers into your lists. In this blog, I will take you through some of my favorite features of Google Keep and take a look at my custom headers available in my TPT store.
CREATING KEEP NOTES WITH CHECKLISTS
I love nothing more than crossing items off of my checklist through the day. The feeling of getting stuff done is a feeling I live for. Google Keep makes it easy to create my daily, weekly or even monthly lists and go through and check off items as I finish each task. You can even create a reoccurring list and reset your list at the end of the day to get it ready for the next day. Here’s how you can create checklists in your Google Keep notes.
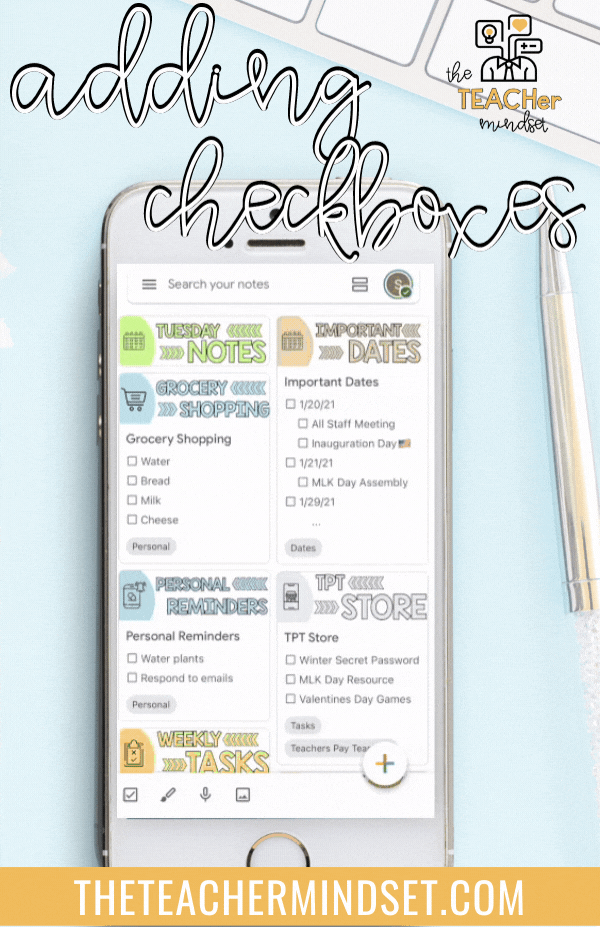
Start by opening up a new note. Then add a title in the title section of the note and type in the text in the note section. Be sure to add each checklist item on a different line. After your text has been added to the note, select the plus sign at the bottom left corner of the note. From the menu select Checkboxes. Now you can check and uncheck the items on your checklist.
If you have a long checklist that you need to use over and over again, unchecking each item my be a little tedious. You can uncheck all of the items by selecting the three dots to the right of your title and selecting Uncheck all items. Your checklist is now reset and ready to go.
CATEGORIZING KEEP NOTES WITH LABELS

As you continue to add notes to Google Keep categorizing your notes can help to make searching for notes much easier. Adding labels can help you categorize like notes and acts like a folder for your Google Keep notes. To create labels in Google Keep, start by selecting the three dots at the bottom right corner of your note. Select Labels to open the labels section. Type in the name of the label to search for an existing label or to create a new label. To create a new label select Create “name of label.” Once the label has been created select the checkbox to add the label to the note. Now you can search for notes via labels.
Once you have your notes categorized with labels, you can select a label to search for notes. To search for notes via label, select the three lines at the top right corner of your Google Keep homepage. Select a label from the Labels section to view all of the notes within the selected label.
I love organizing my notes into TPT and personal categories. This helps me to keep the notes separate but organized under one Google Keep account. How do you like to organize and categorize your Google Keep notes? Let me know in the comments below.
SETTING REMINDERS FOR KEEP NOTES

Am I the only person that has the tendency to create a to-do list and then forget to check to the to-do list? With so much going on in my head I find that I am in constant need of reminders. I love that Google Keep allows me to set reminders for my notes. I can create a note and set a time to remind myself to go back and review my note. Here is how you can add reminders to your notes.
Start by opening your note. Select the bell with the plus sign at the top right corner of the note. Select your date and time for the reminder. You can select Repeat if you would like for your note to select you repeated reminders. Select Pick Place to add a location to your reminder. Select the check mark in the top right corner. Now your note will send you a reminder at the selected date and time.
I love creating checklists for my day to day tasks and setting a reminder around the time that I want to tackle my checklist. My morning prep time, lunch time and after school prep time are great times of the day to tackle my to-do list. That allows me to complete check out of work at the end of the day. What are some ways that you use reminders? Let me know if the comments below.
CUSTOM GOOGLE KEEP HEADERS
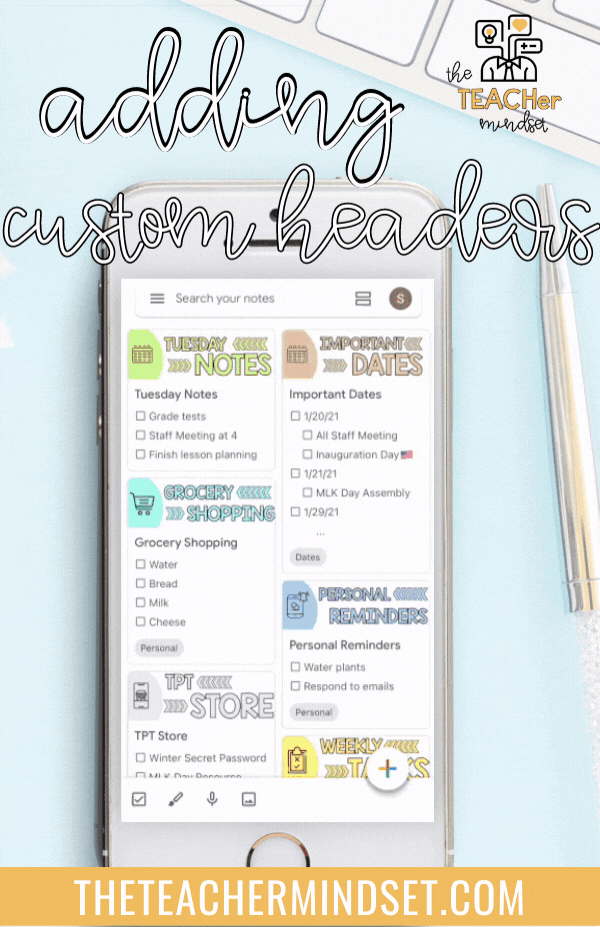
Now that my notes are organized and set up with reminders, I can go through and give them a touch of color and pop by adding custom headers. I created a set of custom Google Keep headers to match my keep notes. Here is how you can add a custom header to your Google Keep notes.
Start by selecting the plus sign on the Google Keep home page to create a new note. Then select he plus sign at the bottom left corner of the note and select Choose Image. Select an image from your photos to add into the header of your note.
My Editable Google Keep headers are available in my TPT store. With colors matching the notes on Google Keep, these are a beautiful way to keep reminders and notes for yourself. My headers comes with 19 pre-made options. Each header comes in one of 11 Google Keep preset colors, giving you over 200 headers to choose from. You can also create your own headers with the editable PowerPoint template. The template provided also features a sample icon bank for easy access. Fonts are also embedded to ensure your new headers will match the ones provided. Looking for something simple to get you started, you can check out my free Google Keep headers also available in my TPT store. Select the link below to purchase and/or download. Thank you for checking out this blog post. Looking for more on Google Keep? Let me know in the comments below.